How Schedule Book operates and what to look for.
The Schedule Book in CaddyMaster allows coaches and staff to schedule sessions at any GOLFTEC Training Center and with any coach. For the CSR TEAM, this will be a great resource for finding information on individual Student sessions, information on coach availability, and location availability.
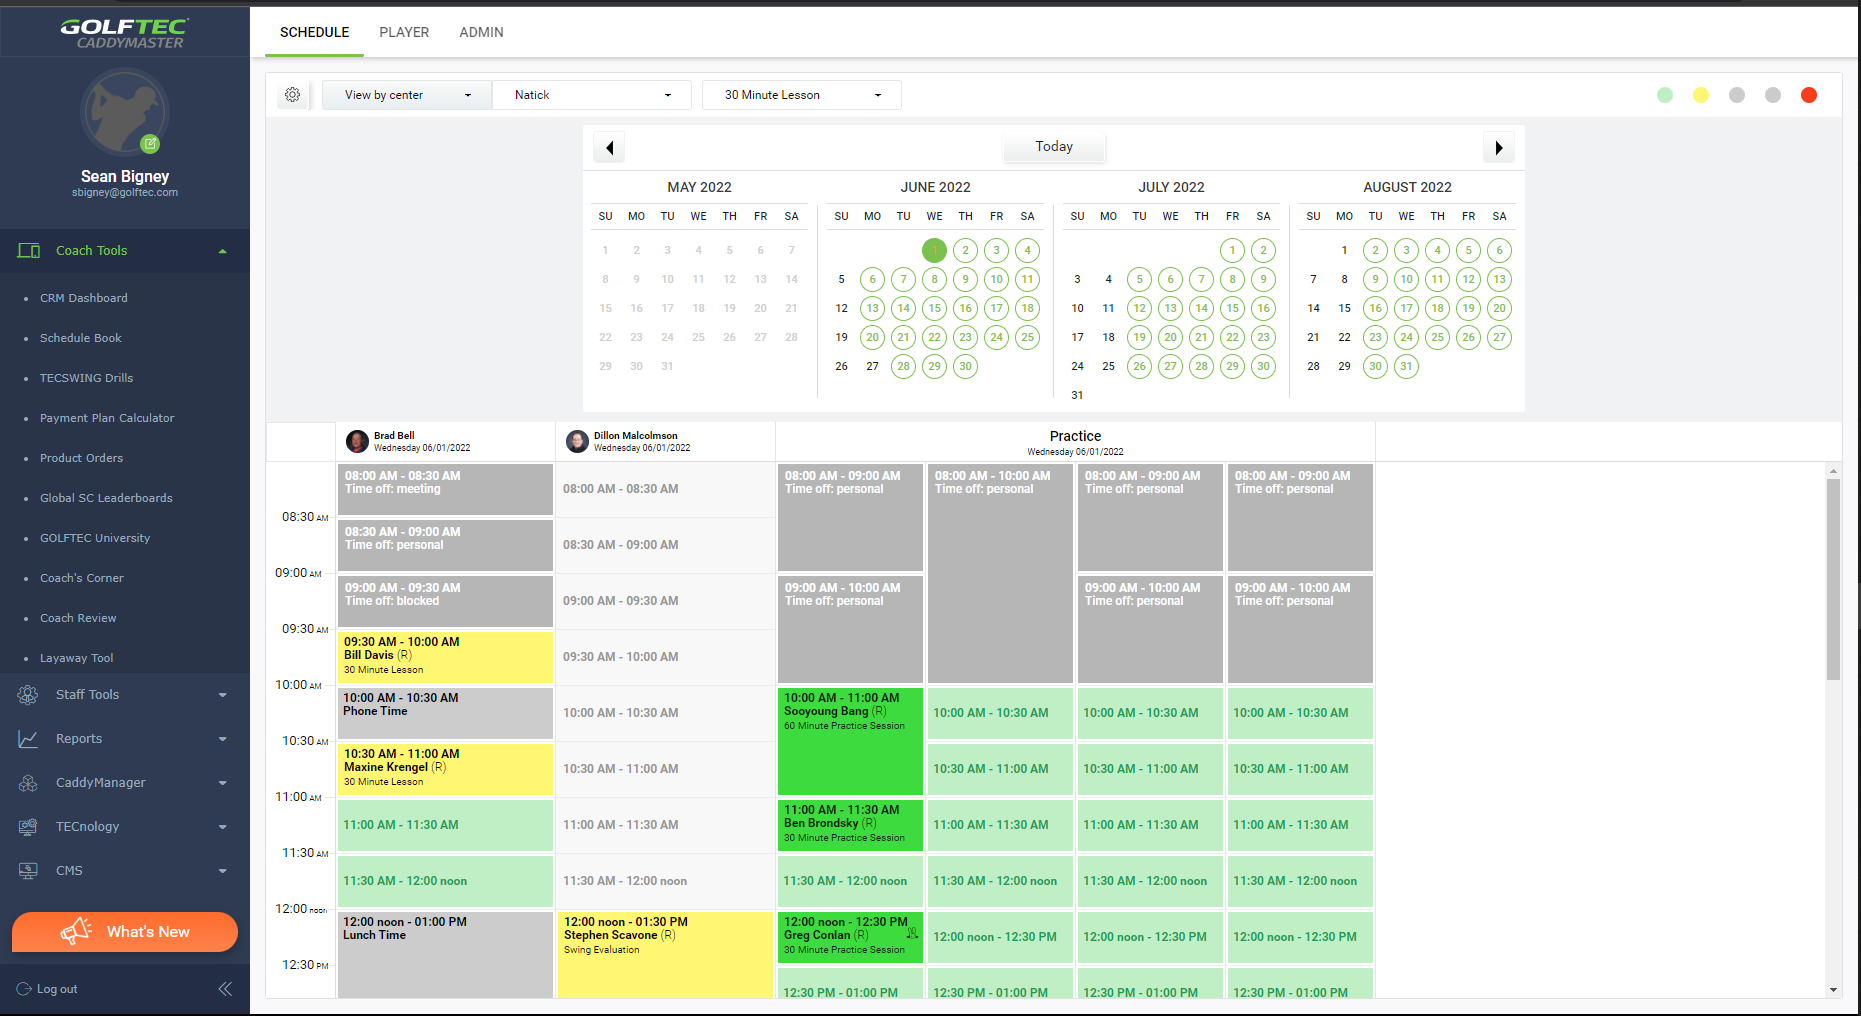
The Schedule Book is listed under Coach Tools in CaddyMaster.
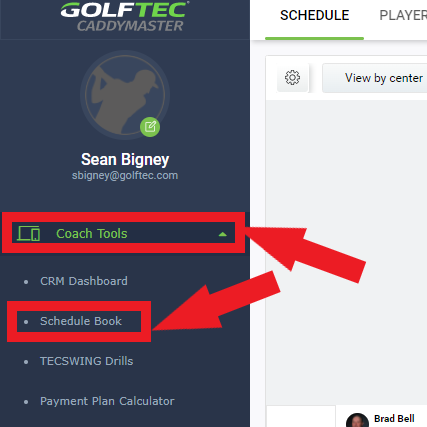
The Schedule Book itself consists of 3 parts:
- Navigation
- Navigation opens with options for:
- Schedule - The Schedule Book
- This Article will focus on Schedule and give as much detail on how it functions.
- Player - Student Search
- For more information on Player and Student searches, review the Player KB Article.
- Admin - For use by Managers for setting up coaching and center schedules
- In the CSR Team, we will not deal with this area of CaddyMaster.
- This is solely for Center and Regional Managers to set the coaching schedule and put any necessary blocks, such as vacations, holidays, or Center-wide training.
- Schedule - The Schedule Book
- If you search for students/open Student profiles, they will populate up here.
- The Bolded and Underlined word is the currently selected section.
- Clicking on the different words will open different sections of the Schedule Book CaddyMaster page.
- Navigation opens with options for:
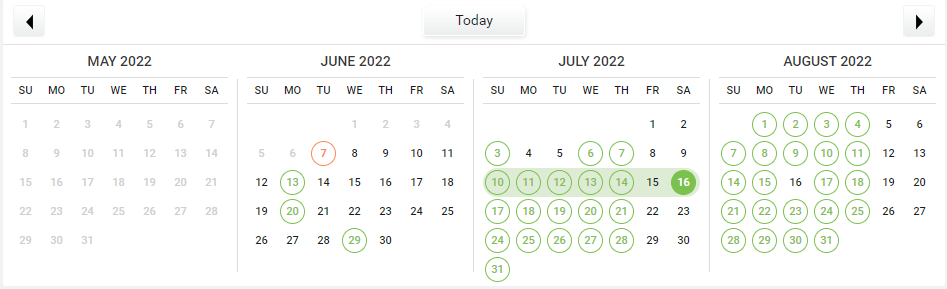
- Parameters and Calendar
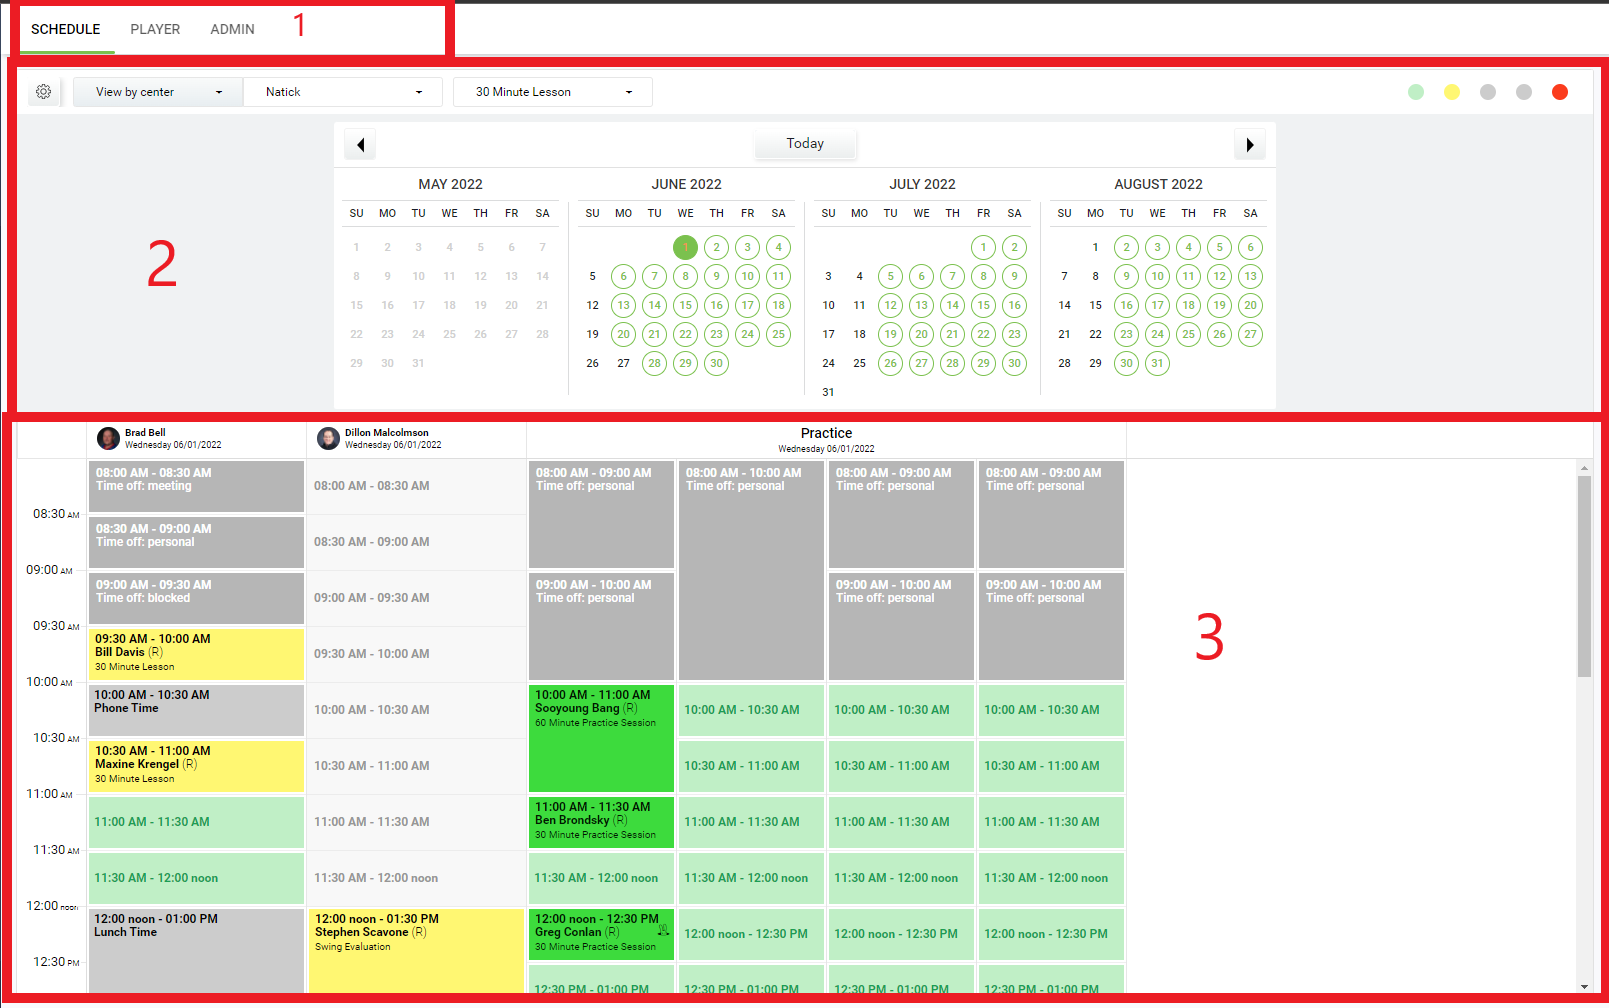
- The Parameters are designed to make searching the Schedule Book easier.
- The
 will give you options on what you would like to view.
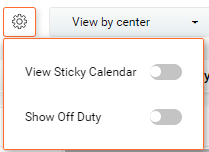
- View Sticky Calendar opens up the Calendar.
- Leaving Sticky Calendar turned off will have the days listed in sequential order in a line.

- The Selected Date will have an Orange Square around it.
- The Current Date (if not selected) will display as
 .
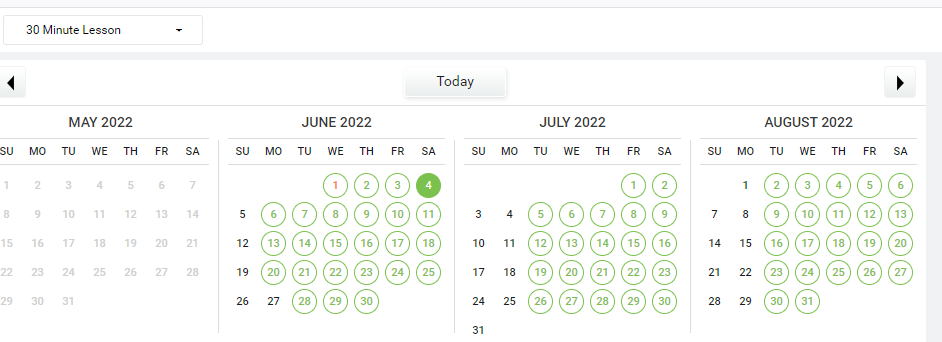
. - Dates with available times for the selected session type are colored Green.
- Dates without available times for the selected session type are colored Black.
- Turning the Sticky Calendar on will open up a month by month calendar with all of the dates listed.
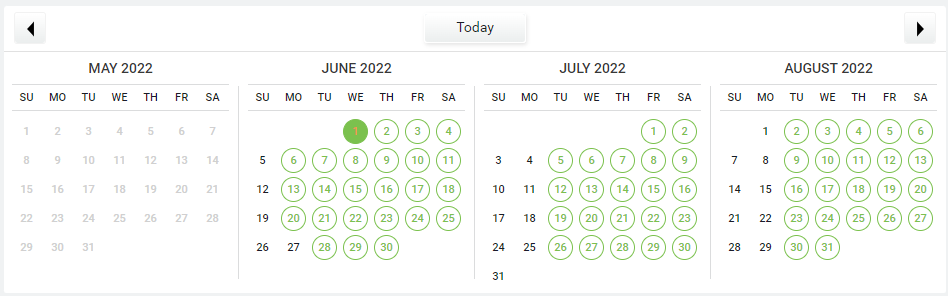
- When viewing the Sticky Calendar, the Selected Date will display as a filled in Green Circle.
- Dates with available times for the selected session type will display Green with a Circle around the date.
- Dates without available times for the selected session type will not have a Circle around them, and the numbers will display Black.
- The Current Date will display with the number in Orange.
- If the Current Date is not selected, it will have an empty ring around the number.
- An Orange ring means no times are available.
- A Green ring means times are available.
- Leaving Sticky Calendar turned off will have the days listed in sequential order in a line.
- Show Off Duty will show all of the coaches for the selected center no matter which day you select.
- If you leave Show Off Duty turned off, coaches that do not have any appointments on a selected date will not display.
VS.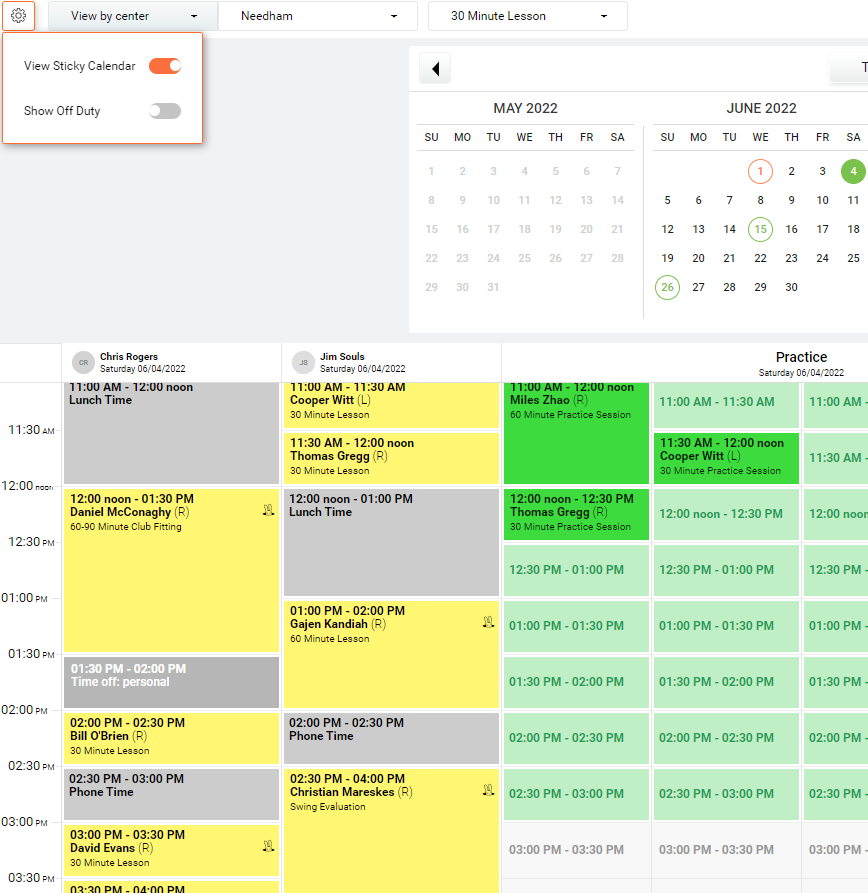
- Leaving Show Off Duty turned off will remove some of the extra clutter in the Schedule.
- Turning Show Off Duty on will give you the ability to always see the coaches that are working out of a specific center.
- If you leave Show Off Duty turned off, coaches that do not have any appointments on a selected date will not display.
- View Sticky Calendar opens up the Calendar.
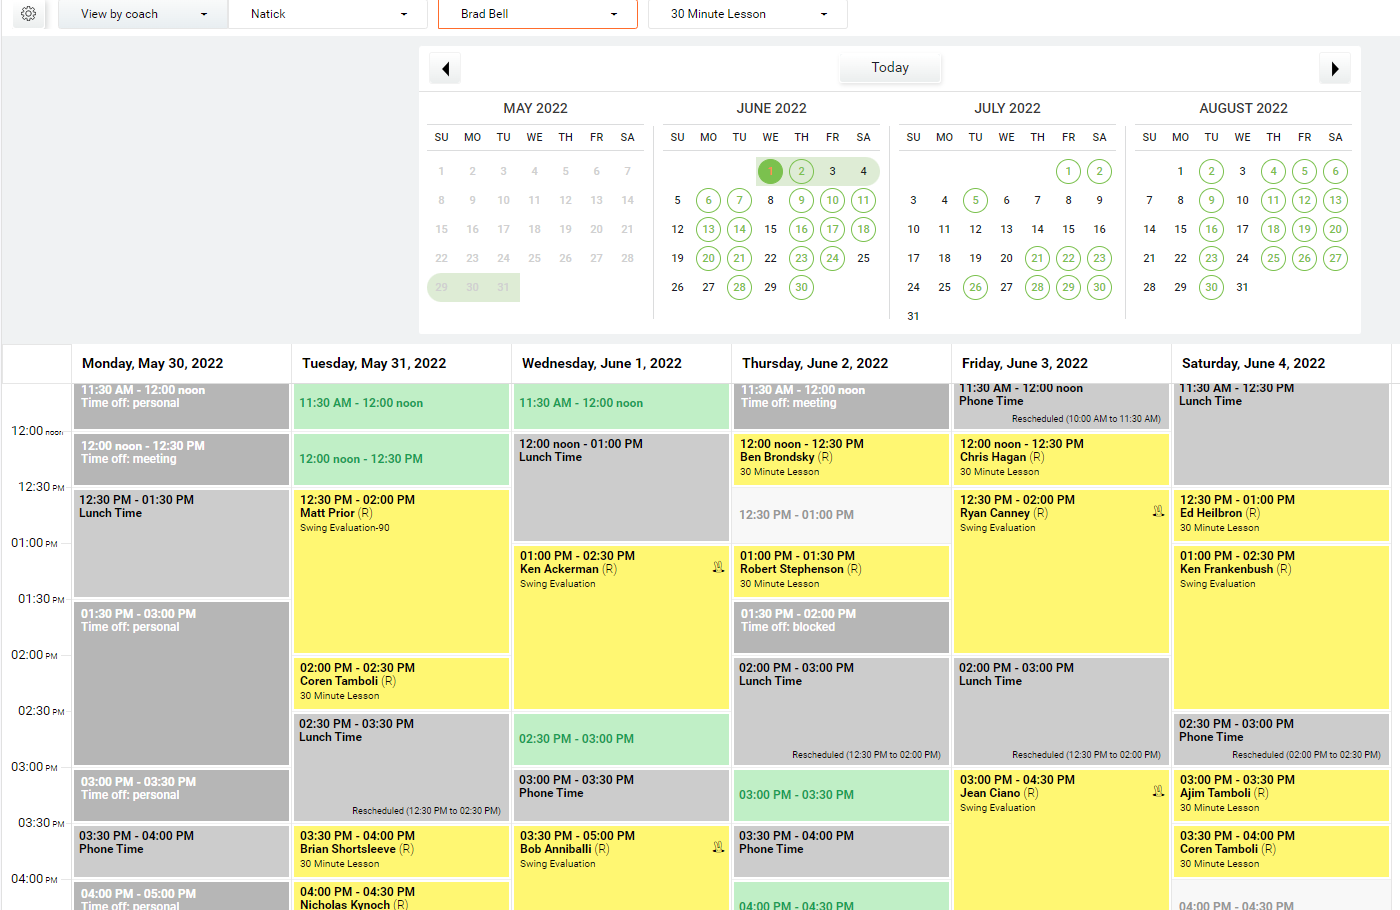
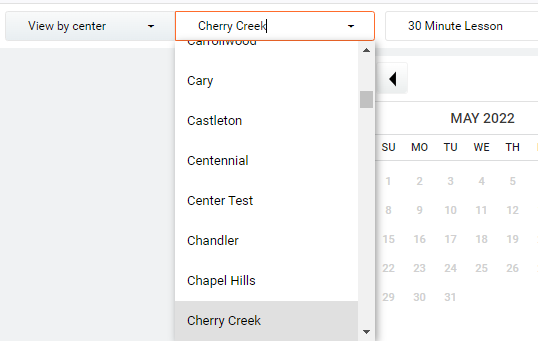
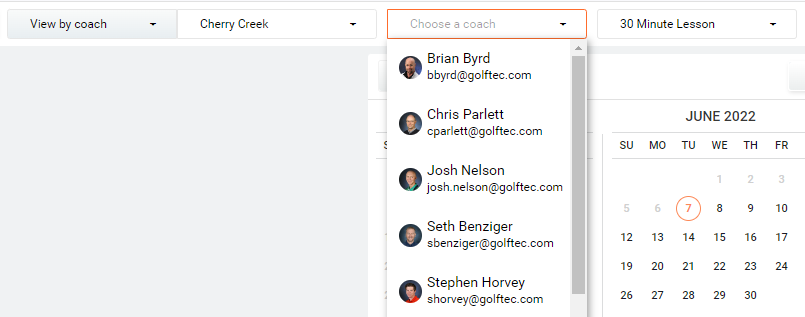
- It has options for viewing the schedule by either center or coach.


- Note that if you select View by coach, you will still have to choose which Center before you can select a coach.
- When you choose a Coach, you will see their schedule for a given week, unlike View by center which shows just a specific day.
- If you are looking at View by center, you can click on a coach's name to switch to View by coach, with that specific coach's schedule appearing.
- When searching for a Center, you can scroll through the Center names (listed alphabetically), or you can type in the name of the center you are searching for.
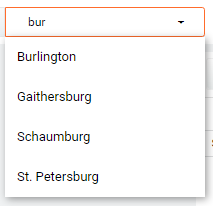
- It will offer all locations that include the string of letters that you enter so that you will not need to type the Center's entire name.
- Clicking on the location that you want to view will pull up that Center's schedule.
- You can do the same when using View by coach for both the center and coach, but there are generally only a few coaches, so typing their name isn't generally necessary.
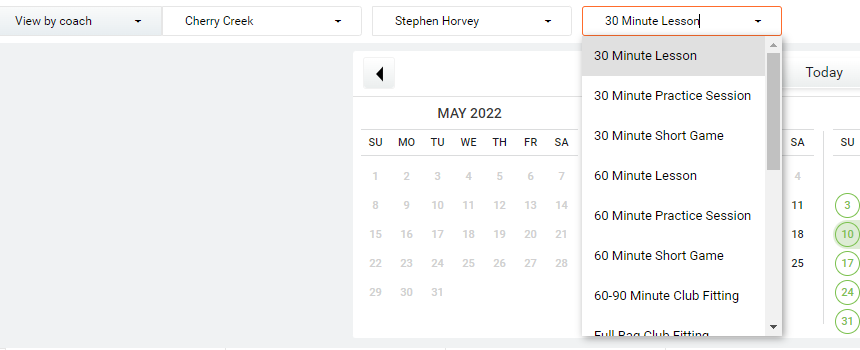
- The last piece of the Parameters is the lesson type.
- Clicking on the lesson type will bring up a drop down menu with all of the various session types and durations.
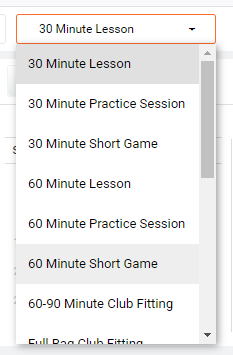
- Clicking a specific session type will alter what shows as available for booking.
VS.
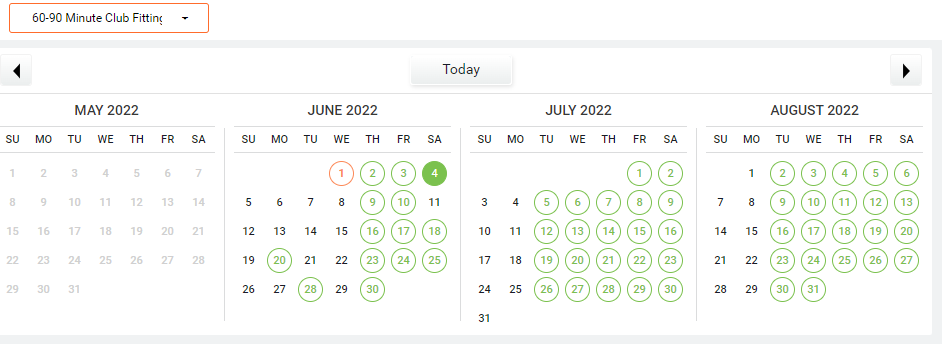
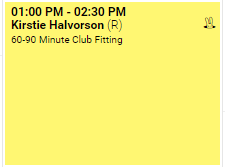
- As you can see in the above example, there are fewer available dates for a 60-90 Minute Club Fitting than a 30 Minute Lesson.
- When looking through the Schedule for available times, this helps to reduce the amount of time spent looking for availability for longer sessions.
- Clicking on the lesson type will bring up a drop down menu with all of the various session types and durations.
- You can transition through the months, or toggle back to Today, by the links on the Calendar.
- If you have the Sticky Calendar turned on, you can move between the months by clicking on the
 or
or  icons listed above the calendar.
- These are very useful if you're looking to see when a lesson was taken months in the past or seeing what is available months in the future.
- Clicking on
 will take you back to the Current Date on the Calendar.
- If you do not have the Sticky Calendar open, you can toggle between the months by using the
 and
and  icons to move to last or next month.
- You can also selected a specific month by clicking
 at the far left of the dates to open the Sticky Calendar and selecting via the same method above.
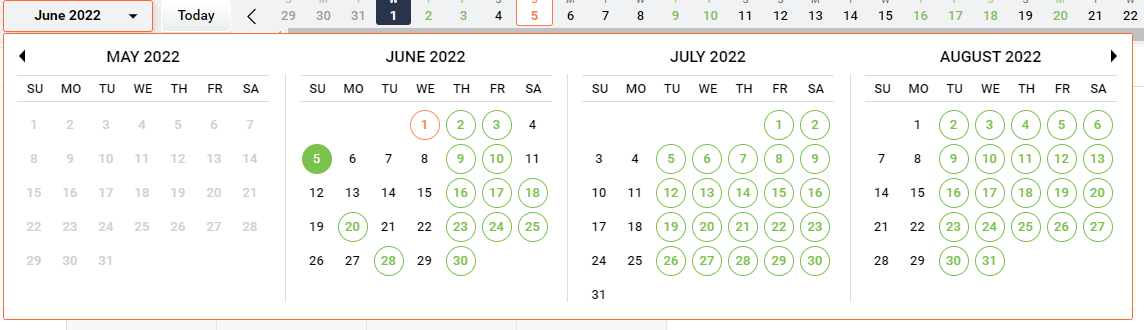
- As with the Sticky Calendar, clicking will bring you back to the current date.
- You can also selected a specific month by clicking
- If you have the Sticky Calendar turned on, you can move between the months by clicking on the
- In the far right corner of the Parameters and Calendar is a set of colored dots.

- These are a key to understanding what the various color coded times mean.
 = Available Practice Slot
 = Booked Practice Slot
 = Available Time Slot for In Bay session
 = Booked Time Slot for In Bay session
 = Available Time Slot for Outdoor Session
 = Booked Time Slot for Outdoor Session
 = Designated Break Time
- These can come in many shades of Gray
- They are used to denote Break Times, Lunch Times, or Personal Time off.
- Any time slot with Gray is a time when a coach is not available.
 = Time Conflict
- Sessions can only be booked as long as there are bays available.
- If all of the bays are booked at a specific time, all other columns will show Red for that time, meaning no new appointments can be schedule.
- If you're in the Calendar and unsure of what a color means, you can click on the corresponding colored dot for clarification.
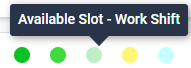
- Not all of these colors are used on every day. For instance, if there are no coaches giving Outdoor Lessons on a chosen day, the Blue Dots will not display in the Key.
- There are some other colors that may be used on a specific time slot that are not displayed in the Key.
- These are for special circumstances that will be discussed in the Schedule portion of this article.
- These are a key to understanding what the various color coded times mean.
- Schedule
- The Schedule is the most important part of this entire Section.
- As this is the brawniest portion of this article, I will be breaking it down into several parts.
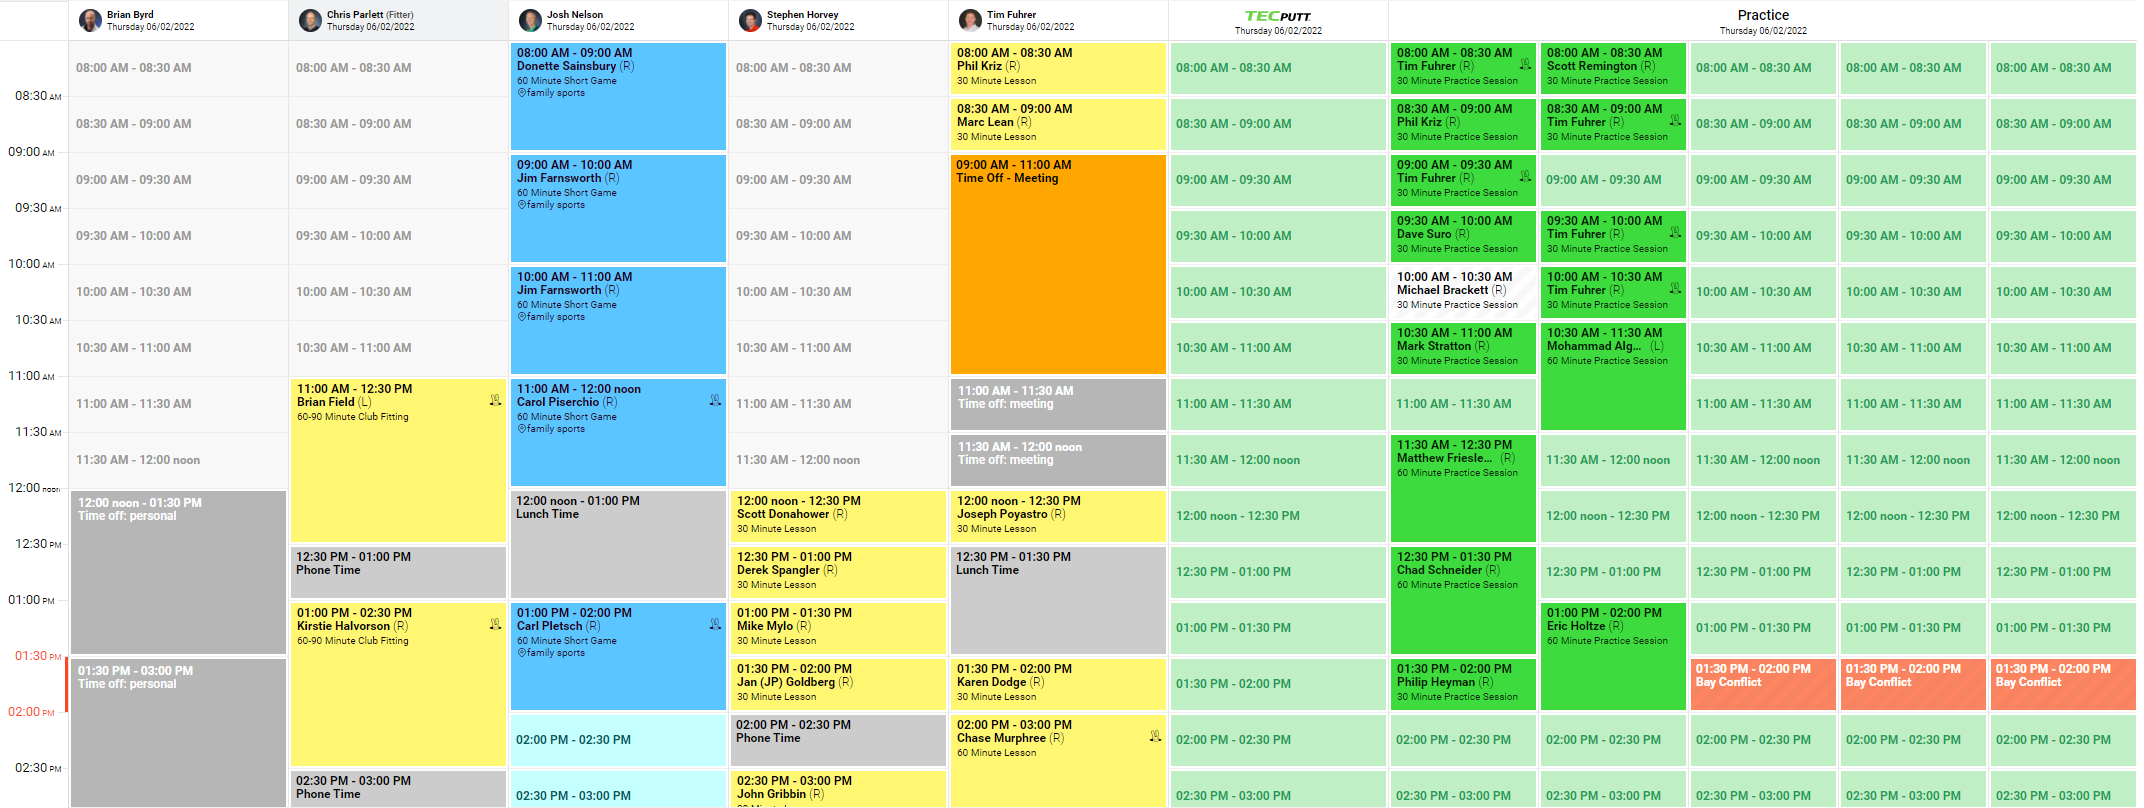
- General Layout
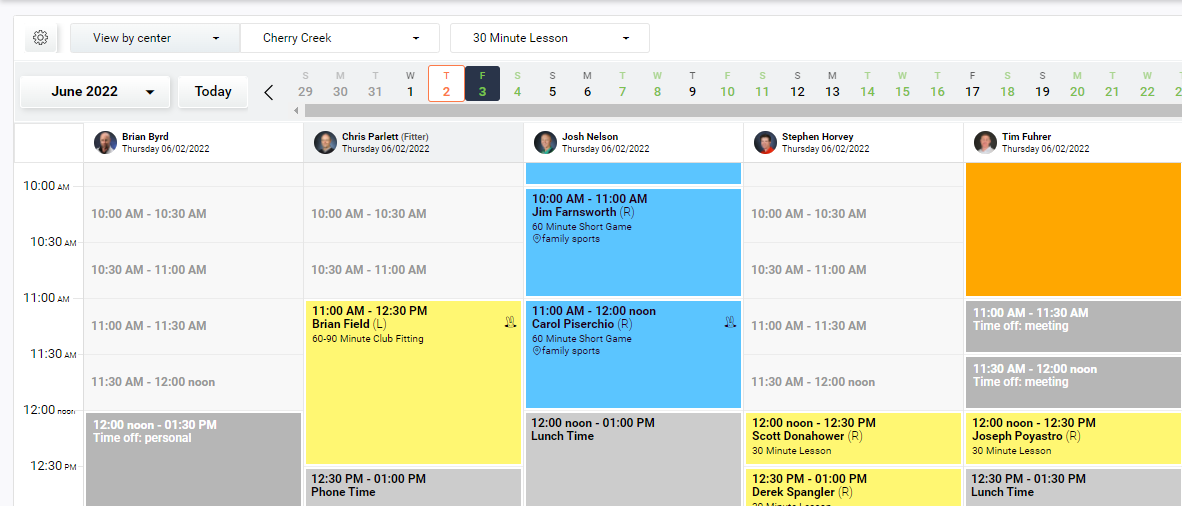
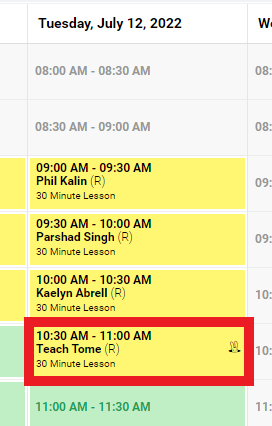
- The Schedule, as with any spreadsheet, has an X and a Y axis.
- The X axis is at the top of the spreadsheet and lists the coaches. In Coach View, the X axis will list dates.
 - Center View
 - Coach View
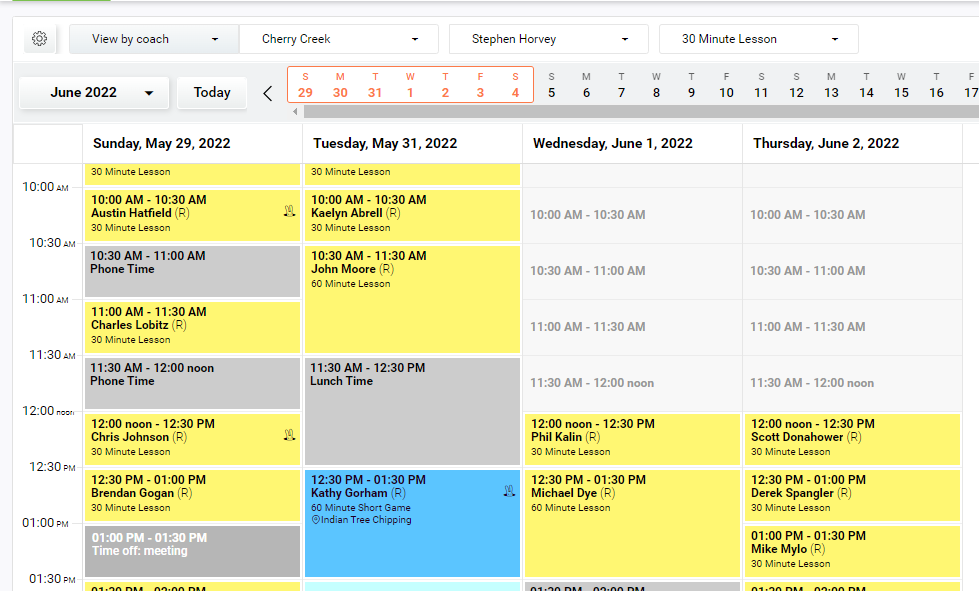
 - The Y axis is on the left side of the screen and lists times from earliest time at the top to latest time at the bottom. This does not change for the Coach View.

- The X axis is at the top of the spreadsheet and lists the coaches. In Coach View, the X axis will list dates.
- They Y axis can give you information on availability.
- For instance, in the above image, you'll notice that 1:30 and 2:00 are red with a red vertical line connecting them.
- This indicates that all of the bays are booked at that time, so scheduling is unavailable from 1:30-2:00.
- This is very useful if you're looking for a specific timeframe, you can see if there are any hitting bays available at a glance.
- Centers with fewer coaches will have fewer columns along the X axis. Centers with more coaches will have more columns and may require scrolling left or right on the provided scroll bar at the bottom.
- All Centers will have more time slots than are generally visible on a normal sized screen. There is a scroll bar on the right side of the Schedule to use for viewing later or earlier times in a day.
- The Coach Names are listed alphabetically by first name and are always listed before Practice Columns.
- Just because a Coach's name is listed first does not mean they are the Center Manager.
- Consult the Training Center Google Doc for information on coaching staff at different locations.
- In addition to the Coaches' columns, every center will have multiple Practice Columns. Most will also have a TECPutt Column.
- These will be discussed in more detail under Coach Information.
- The time is shown in each cell of the Schedule spreadsheet
 to ensure the correct time is chosen.
- The Schedule, as with any spreadsheet, has an X and a Y axis.
- Coach Information
- As stated above, the coaches are listed in alphabetical order by first name.
- Lessons for any coach can only be scheduled under their column.
- i.e. You cannot schedule a lesson with Stephen Horvey under Tim Fuhrer's column.

- i.e. You cannot schedule a lesson with Stephen Horvey under Tim Fuhrer's column.
- For the most part, the coaches teach both lessons and conduct club fittings.
- Newer coaches that have not yet done GTU 2 do not conduct club fittings. Since we don't handle scheduling, you won't need to keep too close an eye on this, but if you're not sure if a coach is too new to offer a club fitting, have a quick look at their schedule to see if any fittings are scheduled with them.
- Some Centers have designated fitters. If a center has a designated fitter, any fittings should be scheduled with them exclusively.
- If a center has a designated fitter, they will be denoted with (Fitter) next to their name.

- Do not schedule lessons under any fitters.
- As of this writing, there are only 15 centers with designated fitters nationwide.
- Of the small number of designated fitters nationwide, only 1 or 2 offer lessons, and those are with existing students that they have been working with since before they became exclusively a fitter. Those students know to schedule directly with their coach.
- If a center has a designated fitter, they will be denoted with (Fitter) next to their name.
- Most centers (but not all) will have a TECPutt Column in their schedule.

- This column is for scheduling Putting Lessons.
- Each GOLFTEC Training Center is outfitted with a putting green for conducting Putting Lessons.
- Like the hitting bays, only one student can work on the putting green at a time.
- When a student schedules a Putting Lesson, it populates into this column, showing that the putting green is taken. It will also populate under the coach's column that is giving the lesson.
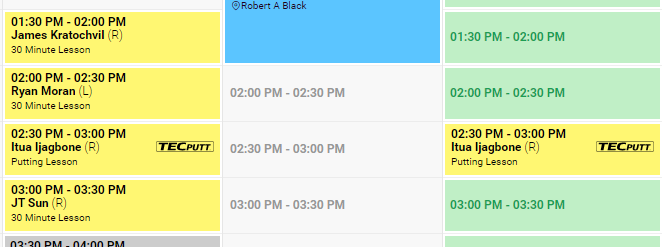
- Note that the lesson in the coach's column explicitly denotes that it is a Putting Lesson with TECPutt listed.
- This lets the coach know that he/she is booked at that time and that is on the putting green, not in one of the hitting bays.
- When a coach is conducting outdoor lessons, they will spend at least half of the day, if not the entire day, at a specified golf course. You will be able to see which coaches are doing outdoor lessons because all available booking for them on a specific day will show entirely in one of two shades of blue.
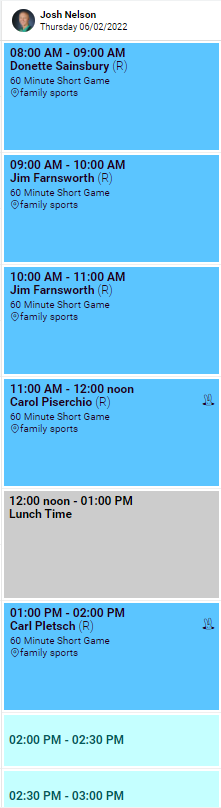
- As noted above, the darker blue is for lessons scheduled, lighter blue is available appointments.
- All Outdoor Lessons must be scheduled directly with the coach.
- Since Outdoor Lessons take place at a nearby golf course or driving range, the coach is responsible for coordinating with the student.
- To avoid confusion, the coach will give the student information on when to show up, what to bring, and where to meet at the Range/Course.
- If you want to see a specific coach's schedule, you can click on their name at the top of the schedule to open View by coach with that coach already selected.
- We will discuss uses for this lower down under Uses within the CSR Department.
- The furthest right columns are always listed under Practice.

- Our scheduling is set up by coach, rather than by hitting bay. This allows for things like outdoor lessons or putting lessons without the issue of taking up a bay. Our centers also only have 1 left handed hitting bay, generally speaking, so this allows for coaches to move between bays depending on the student's handedness.
- Practice is listed as a coach to keep scheduling consistent, but the schedule is set up so that only practices can be booked under Practice.
- Most locations have it set up such that only one practice bay is available to schedule at a given time through the GOLFTEC Clubhouse.
- This is designed to avoid having too many people practicing at once such that there are no bays available for lessons.
- Obviously, more practices can be booked, especially if all of the coaches are already in lessons or on break, but the student will need to call in to either the center or the Concierge Team to schedule if the time they want is already booked.
- Consult the Booking Logic KB Article for more information on how practices are booked.
- Appointment Information
- Each appointment on the schedule has a lot of information available right away, with more that is accessible.
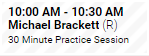
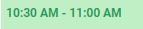
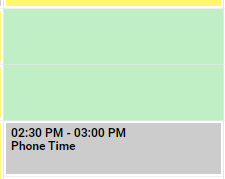
- At the top of each booking will be the time of the lesson.
- Under the time will be the Student's name along with their Handedness.
- (R) for Right Handed
- (L) for Left Handed
- (U) for Undefined - no lessons should be scheduled without a handedness designated, but this does occur on rare occasions.
- Below the name and handedness is the lesson designation. There are many lesson types, but the most common are:
- 30 Minute Full Swing Lesson
- 60 Minute Full Swing Lesson
- Swing Evaluation
- 60-90 Minute Club Fitting
- Full Bag Club Fitting
- Playing Lesson
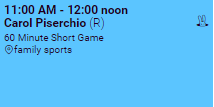
- 60 Minute Short Game Lesson
- If the lesson scheduled is an Outdoor Lesson, it will also list the location underneath the lesson designation.
- This is useful in the event that a Student reaches out because they do not remember where the lesson is taking place.
- The GOLFTEC Clubhouse should show the location of the Outdoor Lesson as well, but not all students know this.
- Students that do not have any active lesson or fitting credits on their account will have a
 icon listed in the upper right of the appointment cell.
- These Students may be brand new or returning students who have not purchased a lesson package yet.
- This icon will alert coaches that they will have to charge the individual for the session.
- Students with active lesson credits will not show this icon.
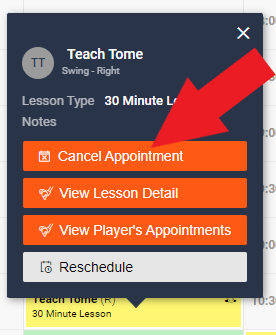
- Clicking on an individual lesson will bring up further information on the Lesson and the Student.
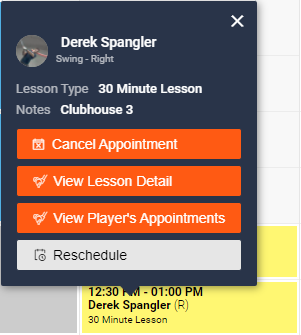
- The Student's name and profile picture (if available) will be listed at the top with their handedness listed below. In this example's case, Swing - Right denotes that they are right handed.
- If you click on the Student's name, it will open their Student Profile in a separate tab in CaddyMaster.
- We will discuss the uses for this further down.
- Under the student information is the Lesson Type and Notes
- Notes will be added at the time of the booking.
- If they schedule online through the Clubhouse, it will show Clubhouse.
- If scheduled over the phone, the coach or Concierge Team Member will list any necessary information in the notes field, but it may be left blank if no notes are necessary. We will discuss Scheduling in more detail further down in this Article.
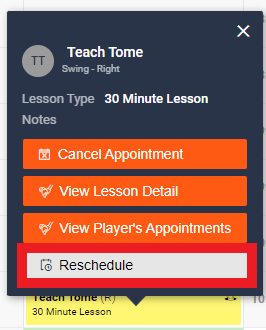
- From there, you will see links to different options. We will discuss Cancel Appointment and Reschedule further down.
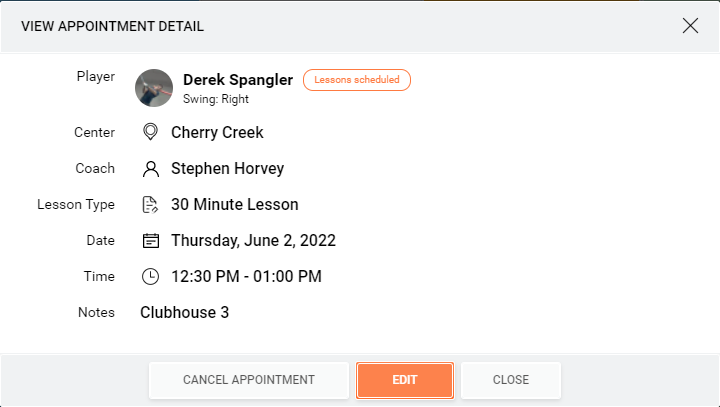
- Clicking View Lesson Detail will open the below dialogue box.
- If you click on
 next to the Student's name, it will bring up a dialogue box with all of their future appointments listed.
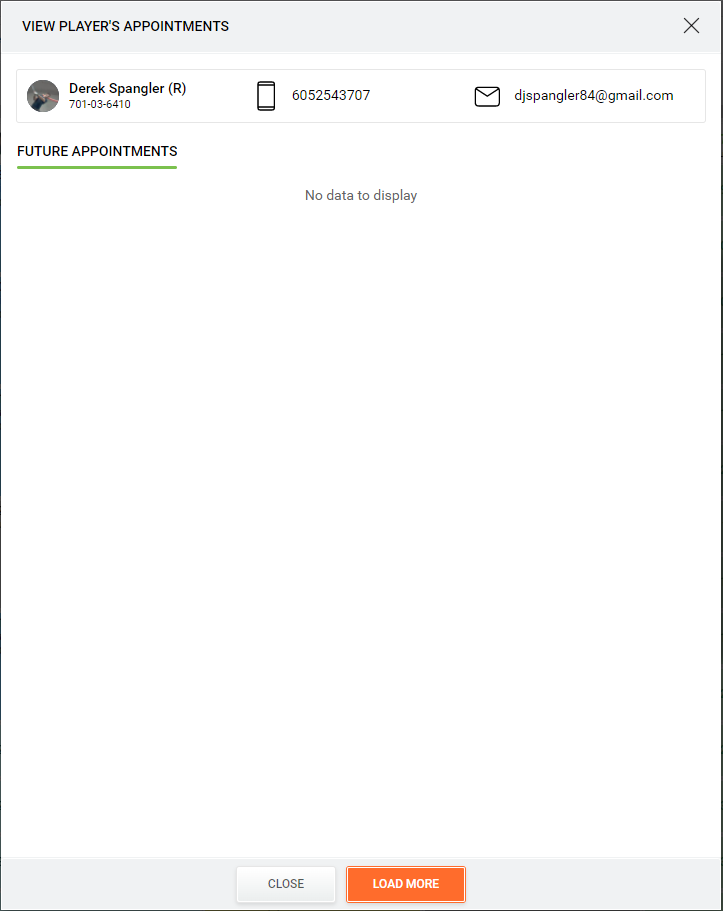
- You can also reach this screen by clicking on
 listed under View Lesson Detail on the lesson pop up.
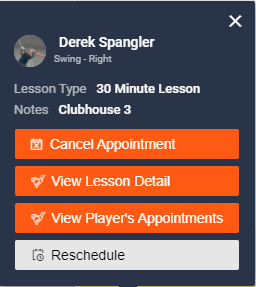
- You can also reach this screen by clicking on
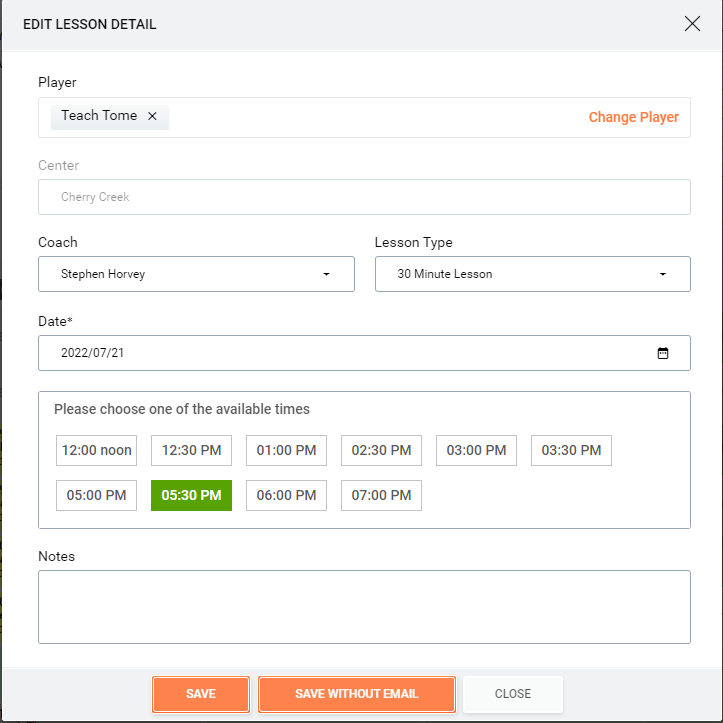
- You can Edit appointment details from this dialogue box by clicking
 .
. 
- This dialogue box will allow for updating notes, choosing a different time (if any are available), changing the date, lesson type, coach, or even student.
- For instance, if the lesson was scheduled under a wrong student account, click on
 to open a dialogue box where you can search for and choose the correct student.
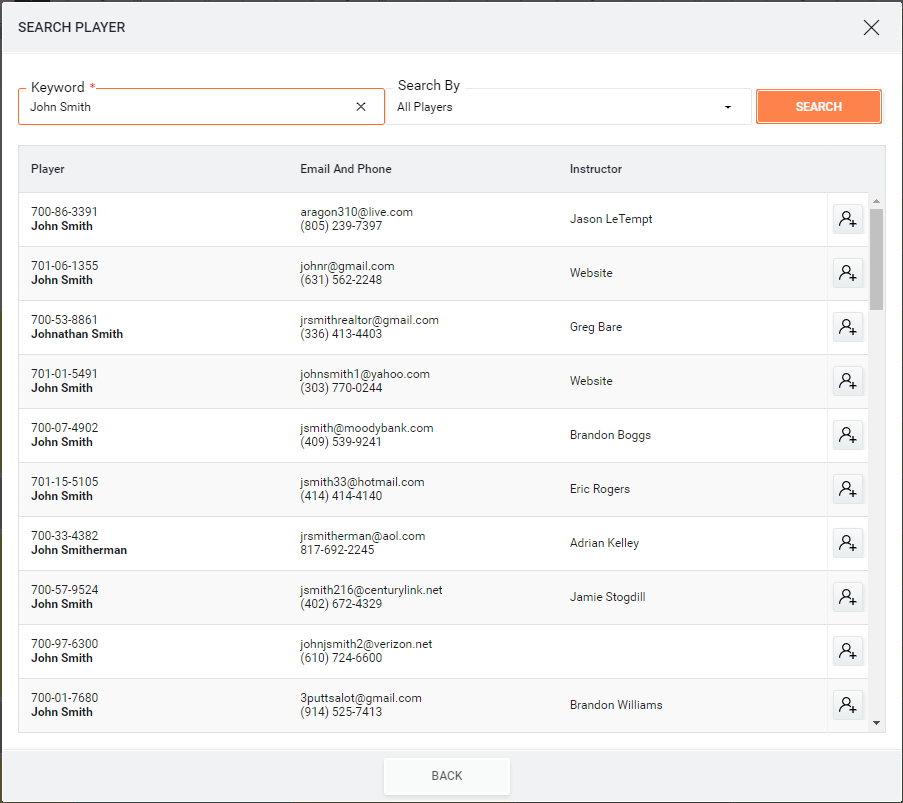
- Searching for the correct Student's WUCI is the fastest way to find the correct student, but you can search by name, email, or phone number, as well.
- Once you've found the correct student, click the
 icon to the right of that student to make the change.
- Clicking on the Coach or Lesson Type will result in a drop down appearing that will show the other options available.
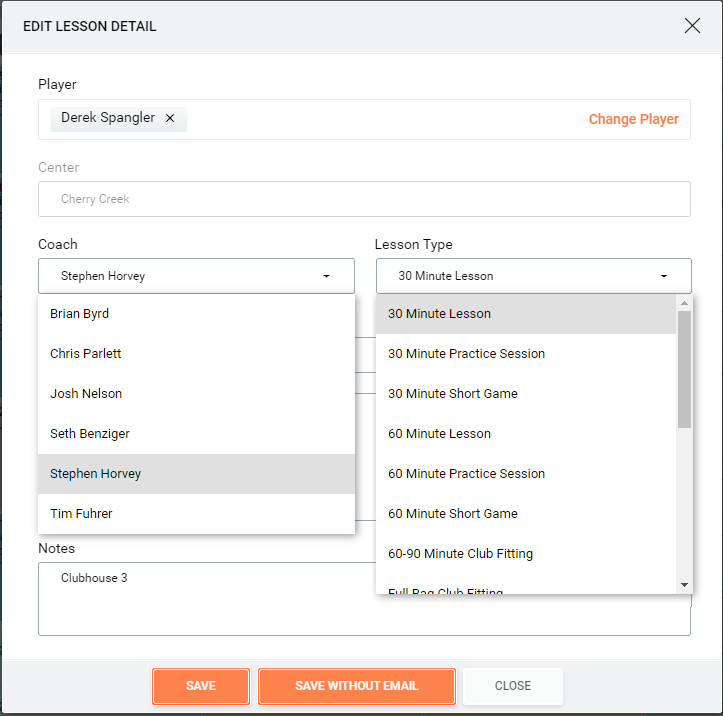
- Clicking on the
 icon will bring up a calendar to reschedule the appointment to a different date, if that is needed.
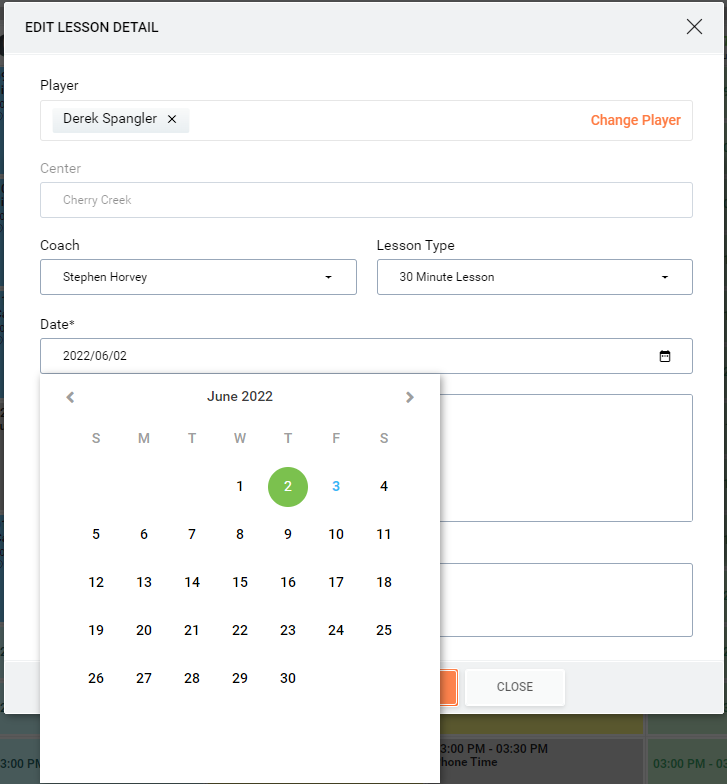
- Choosing a different date will populate other times available to pick from.
- A time will have to be selected in order to save any changes.
- If you do make any changes that you want to keep, you can choose Save or Save Without Email.
- Save will send a confirmation of all changes and updates to the Student.
- Save Without Email will not send an email to the student and should only be used if the Notes are the only changes made.
- Clicking the
 or
or  icons will close the dialogue box without saving any changes.
- If you click on
- The Student's name and profile picture (if available) will be listed at the top with their handedness listed below. In this example's case, Swing - Right denotes that they are right handed.
- You will come across cells in the Schedule that are not for appointments but are blocks in the schedule.
- Coaches have designated breaks in their schedule throughout the day when they are not teaching lessons.
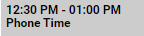 will display in cells for times when the coach is not in a lesson but still working. During these times, coaches will do administration tasks (answer phones, respond to emails, contact leads, etc.) or they may use this time to chat with Students or Leads that have walked in.
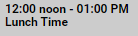 displays in cells during the coach's lunch break when they are not on the clock and not working.
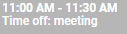 are blocks for meetings. These are most often seen in Center Manager schedules for meetings, but will be seen in a Coach's column as well if they're also involved in that or a different meeting.
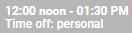 is generally used to block out coach schedules when the coach is on vacation. Instead of taking them off of their regularly scheduled shifts, these blocks will be put in place so that no students book while the coach is gone.
- Clicking on any of these appointment types will result in a pop up message showing that it is designated as Time Off and the reason.
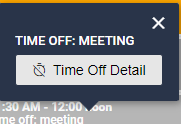
- Clicking on Time Off Detail will open a dialogue box that will give more details and options for cancelling the Time Off. This is only for Center Managers. DO NOT INTERACT WITH THIS POPUP!
- If you accidentally click the icon, choose on the pop up to close it out and avoid making any changes.
- If all of the bays are scheduled for a certain time, all other cells for that time will display a
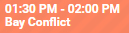 message and will not allow any appointments to be booked at or overlapping that time.
 - If an appointment was cancelled through the GOLFTEC Clubhouse, it will display as
 in the schedule. When a student cancels an appointment this way, the Clubhouse will ask them for a reason which can be viewed by clicking on the lesson to see the lesson notes.
- Coaches have designated breaks in their schedule throughout the day when they are not teaching lessons.
- Each appointment on the schedule has a lot of information available right away, with more that is accessible.
- Scheduling and Cancelling an Appointment
- Scheduling within CaddyMaster is fairly intuitive and straight forward.
- The first step to Scheduling is to set the parameters for your search.
- Select the location that the Student wants to book at.
- If the student works/wants to work with a specific coach, choose the coach.
- Select the lesson type that the Student wants to schedule
- Select the location that the Student wants to book at.
- Once the parameters are set, you will be able to see the Coach's schedule week by week, and the Date Bar or Sticky Calendar will show dates available for that appointment with that coach.

- The selected week is highlighted in the Date Bar by an orange rectangle.
- The selected week is highlighted in the Sticky Calendar by a grayish-green line connecting the dates.
- Find a Date and Time that works for the Student.
- The available times will always show as
 in the cell.
 - Longer appointments, such as a 60-90 Minute Club Fitting, may show differently.

- As you can see, since there are blocks in the schedule, an appointment cannot begin at 1:30 or 2:00.
- Only the start time is shown so that it is the only time quoted to the Student.
- If the coach is available at 2:30, but all of the bays are already scheduled at 2:30, the appointments will list in the same manner to avoid overlap in scheduled appointments.
- For this reason, it is best to select the duration of the appointment you are looking for before quoting any times to the student.
- If there are bays available, but not enough time for the selected appointment, the cells for that time will show a light green without a time listed.
- Longer appointments cannot be booked in these slots.
- You may also come across spaces with multiple times showing than that blank green.
- These indicate you can schedule at any of those times, the latest being 6:30.
- The available times will always show as
- Clicking on that time in the calendar will bring up a pop up.
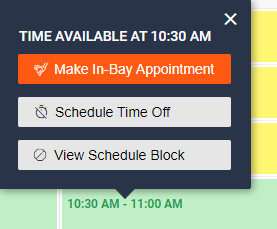
- Choose
 to bring up the Book Appointment Dialogue Box.
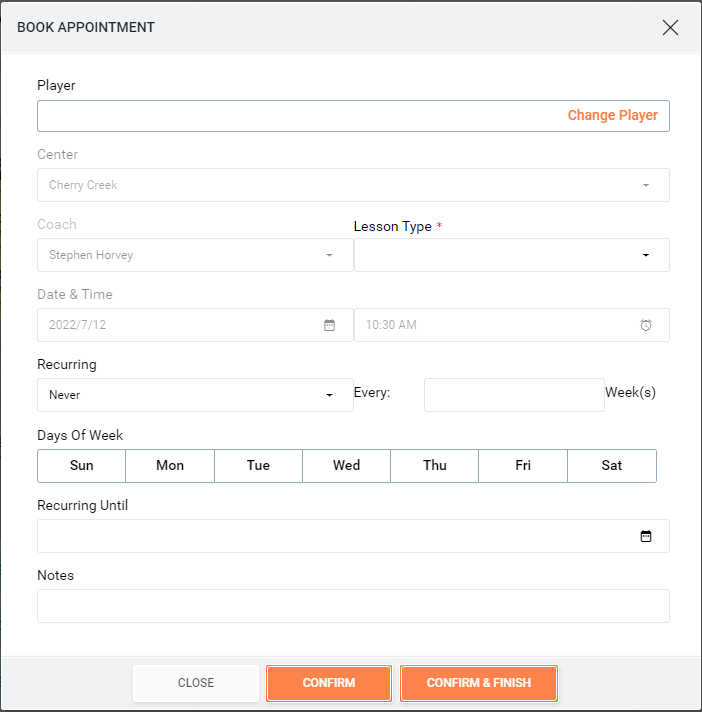
- Click
 to select the Student that is booking and search for that student on the following screen.
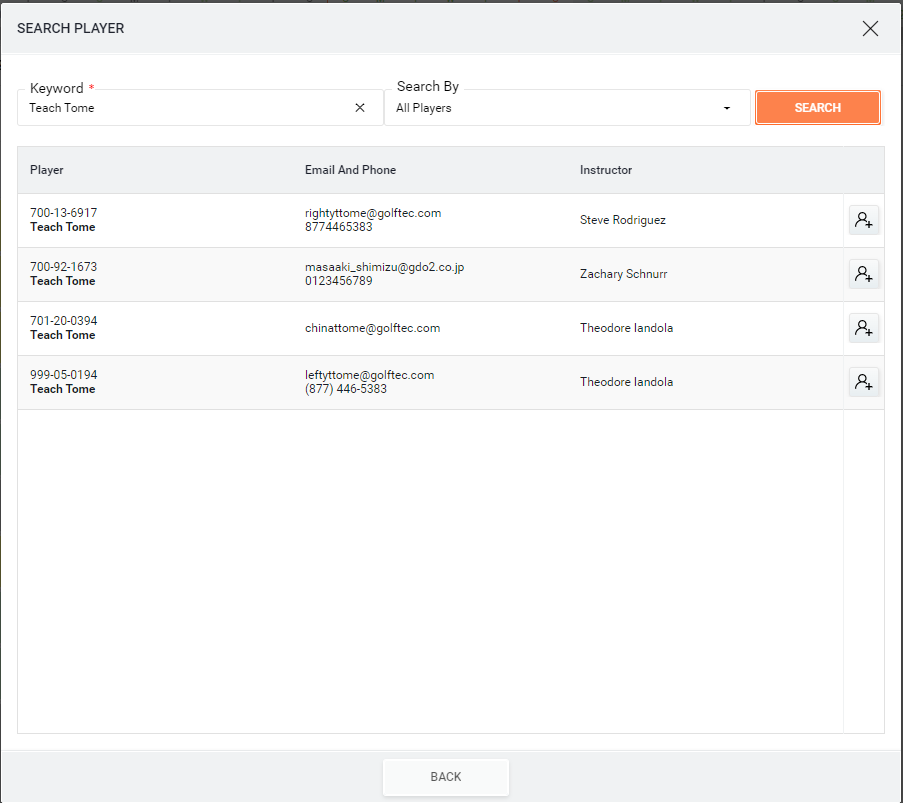
- Click the
 to the right of the desired student to select them.
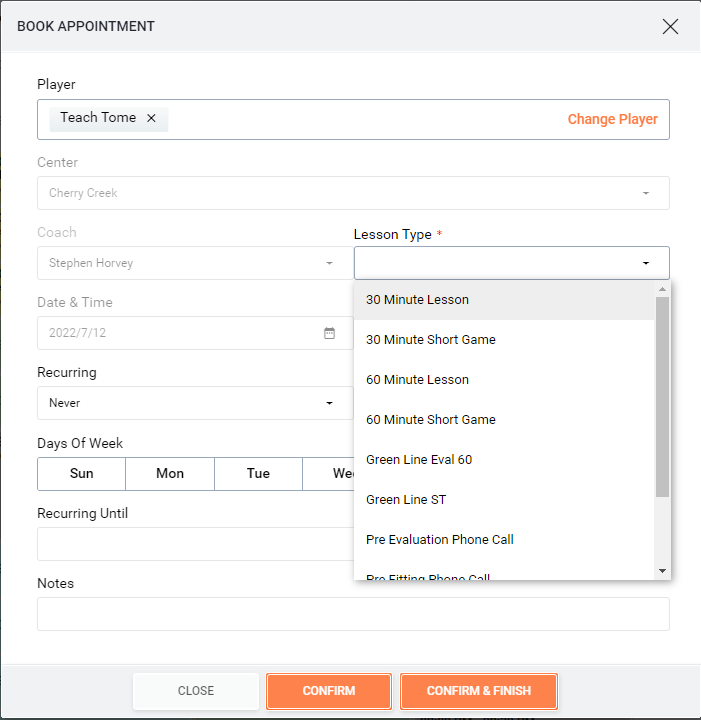
 - Next, Select the Lesson Type.
- From here you will have several options depending on what the Student would like to do.
- Add Notes
- Schedule Recurring
- Schedule a Different Appointment
- Finish
- Add Notes
- If the student mentions that they want to work on something specific, or says something that you feel should be passed on to the coach, type them into the Notes field.
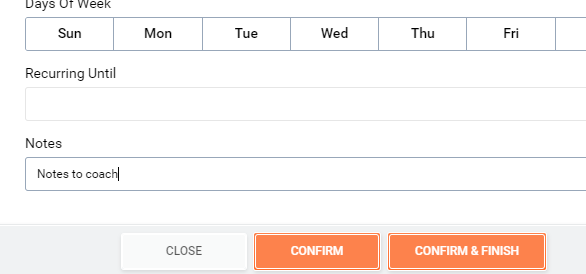
- If the student mentions that they want to work on something specific, or says something that you feel should be passed on to the coach, type them into the Notes field.
- Schedule Recurring
- If the student likes the day of the week and the time and would like to schedule out their lessons, you can set it as a recurring appointment.
- Select Recurring in the Recurring Drop Down.
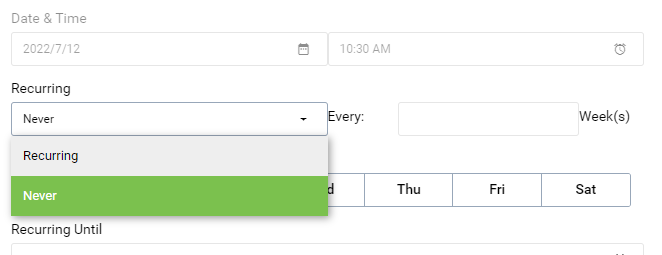
- You will then be able to choose the frequency of the session by filling in a number to the
 , which day of the week it occurs, and choose an end date by clicking the
  icon in the Recurring Until field.
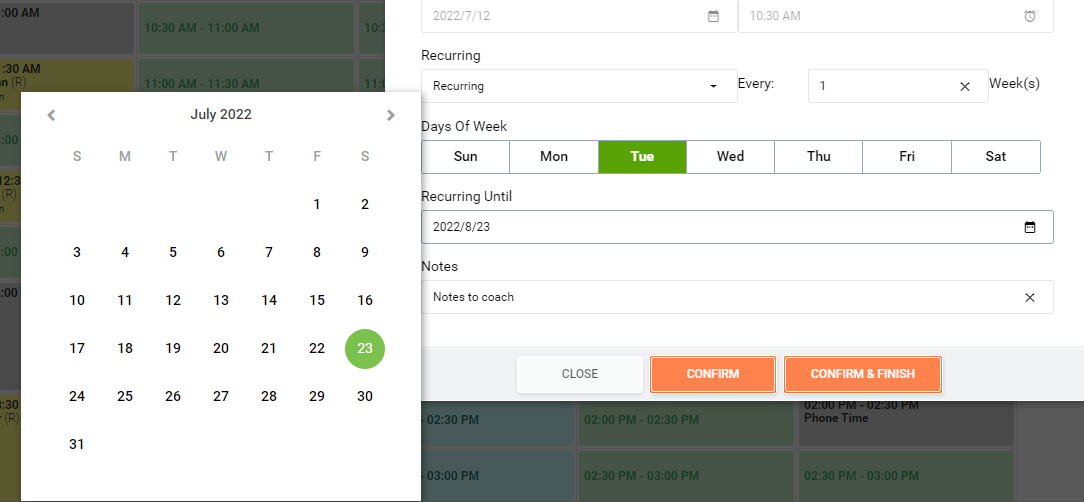
- If these are practice sessions, you can select multiple days of the week so that the Student has a set schedule to come in for practice for the duration of their plan.
- Schedule a Different Appointment
- If the student wants to schedule a different appointment that isn't recurring, click on
 .
. - This will take you back to the Schedule with the Student's information saved to auto populate into the next appointment.
- You will see their information in the upper right corner of the Schedule screen.

- When you select the next date/time, you will not need to select a Player as the Student will already be selected.
- Note - The icons to the right of the Student Name and WUCI will open the Player Profile
 or a list of their Schedule Lessons
  .
.
- If the student wants to schedule a different appointment that isn't recurring, click on
- Finish
- If the Student was only looking to book this session, click
 at the bottom to close out the scheduling session and send a confirmation email to the student.
 - This will also indicate to CaddyMaster that scheduling for this Student is complete. CaddyMaster will stop populating this Student's information into any further appointments.
- You should see the appointment listed in the Schedule and that the Student's name no longer appears in the upper right.
- If the Student was only looking to book this session, click
- Add Notes
- Choose
- The first step to Scheduling is to set the parameters for your search.
- Rescheduling in CaddyMaster can be done in one of two ways.
- First, click on the appointment you would like to reschedule to open the details pop up.
- The first option for rescheduling is to pick the Reschedule option.
- This will bring up the Reschedule Appointment dialogue box.
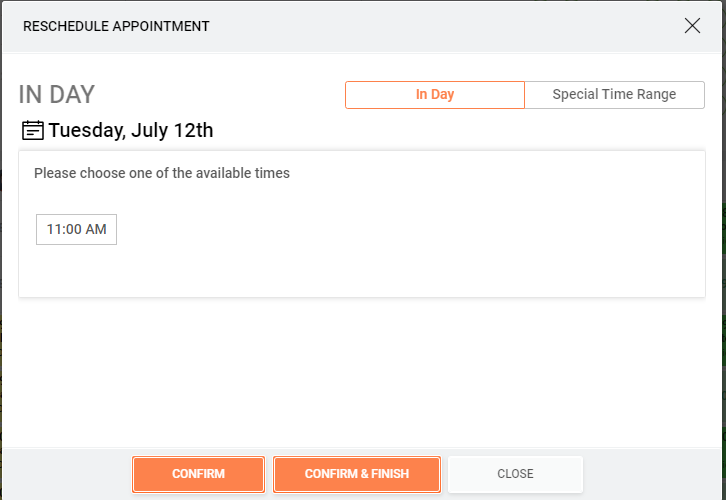
- If the Student is looking to reschedule for the day chosen, but a different time, use the In Day option.
- All available times will be listed for that day.
- Select the time that you wish to change to and choose either Confirm or Confirm & Finish.
- If the Student is looking to book on a different date, choose the Special Time Range option.
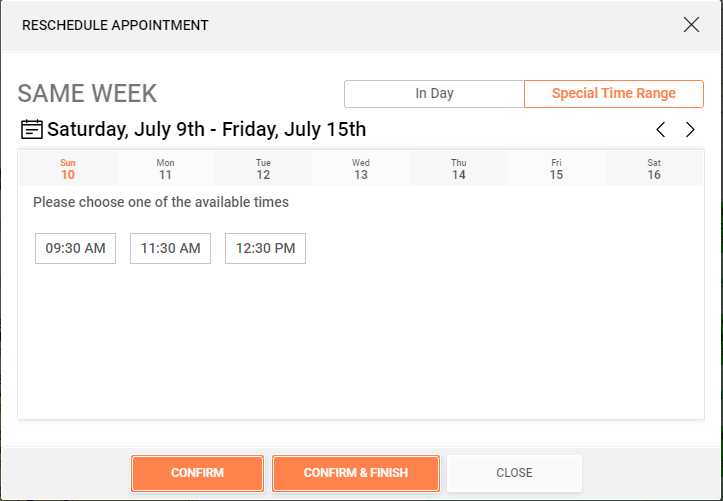
- This will show all available times for each date during a given week.
- You can switch between the weeks by clicking one of the
 icons.
 - Once a date and time are decided on, click on the time and choose either Confirm or Confirm & Finish.
- This will bring up the Reschedule Appointment dialogue box.
- The second option for rescheduling was touched on earlier.
- Follow the above steps under Scheduling to find an appointment that works better for the Student.
- Go back to scheduled appointment and choose View Lesson Detail in the lesson pop up.
- Click on
 in the View Appointment Detail dialogue box.
 - Click on the
 icon under Date in the Edit Lesson Detail dialogue box to pull up a calendar.
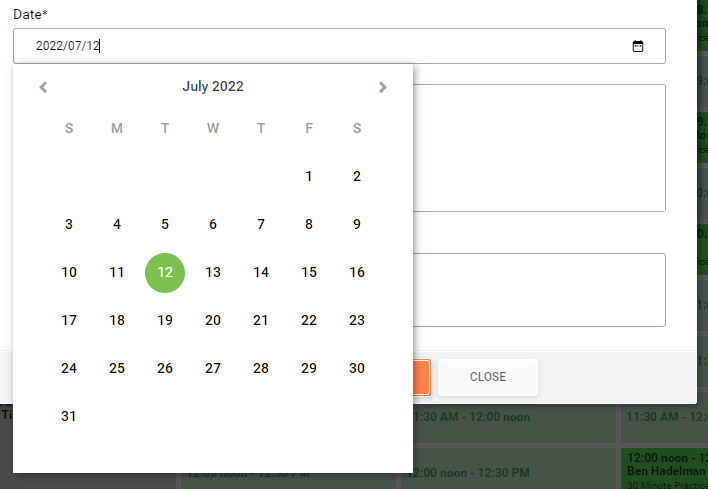
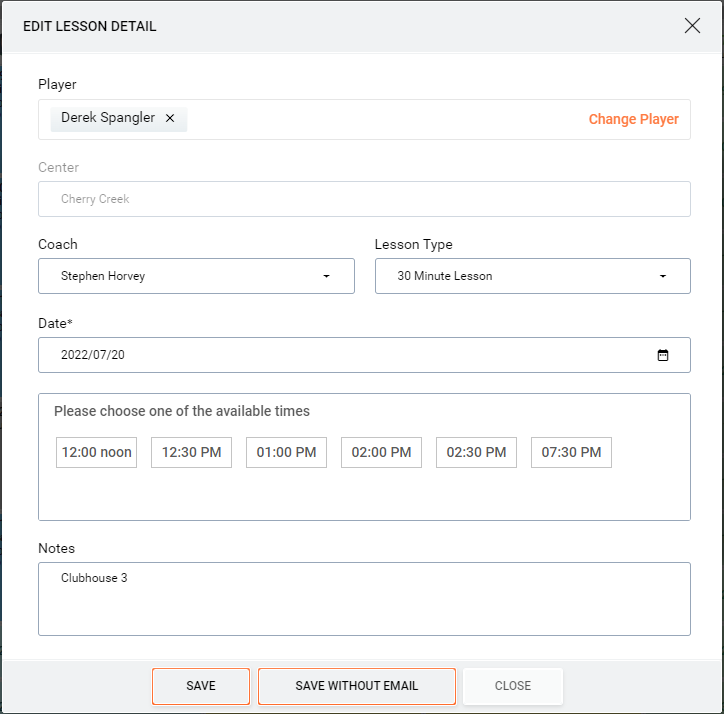
- Search for the date that the Student prefers and select that date to display all available times on that date.
- You can then select the preferred time and choose Save at the bottom to reschedule the appointment and send the student an updated confirmation email.
- The first option for rescheduling is to pick the Reschedule option.
- First, click on the appointment you would like to reschedule to open the details pop up.
- Cancelling within CaddyMaster is a much easier than scheduling.
- To cancel, find the date and time of the appointment you wish to cancel.
- Click on the appointment to open the lesson detail pop up and choose Cancel Appointment.
- This will open a dialogue box with the options to Keep it, Cancel, or Cancel & Finish.
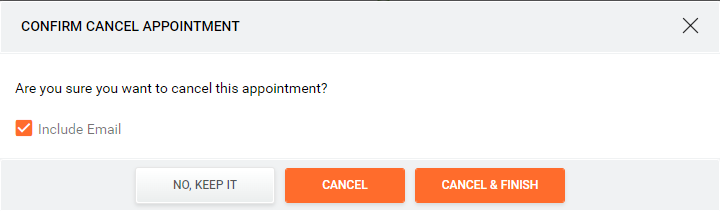
- The checkmark next to Include Email is automatically chosen when you open this dialogue box.
- This is to ensure that an email is sent to the student automatically to inform them of the cancellation.
- If you do not wish to send that automated email, click the
 to deselect it, and no email will be sent to the Student.
 - IT IS BEST TO ALWAYS SEND EMAILS. Unless you have a very good reason not to send an email to the Student, it is best to always choose the option that will update the Student on the current decisions so that they have a trail to refer back to.
- There is also an option for cancelling a batch of lessons if a student has decided to cancel their GOLFTEC Plan or had a schedule change and the day or time previously chosen no longer works.
- In the Lesson Detail Pop up, choose the View Player's Appointments option.
- As previously indicated, this will open up a list of all of their upcoming appointments.
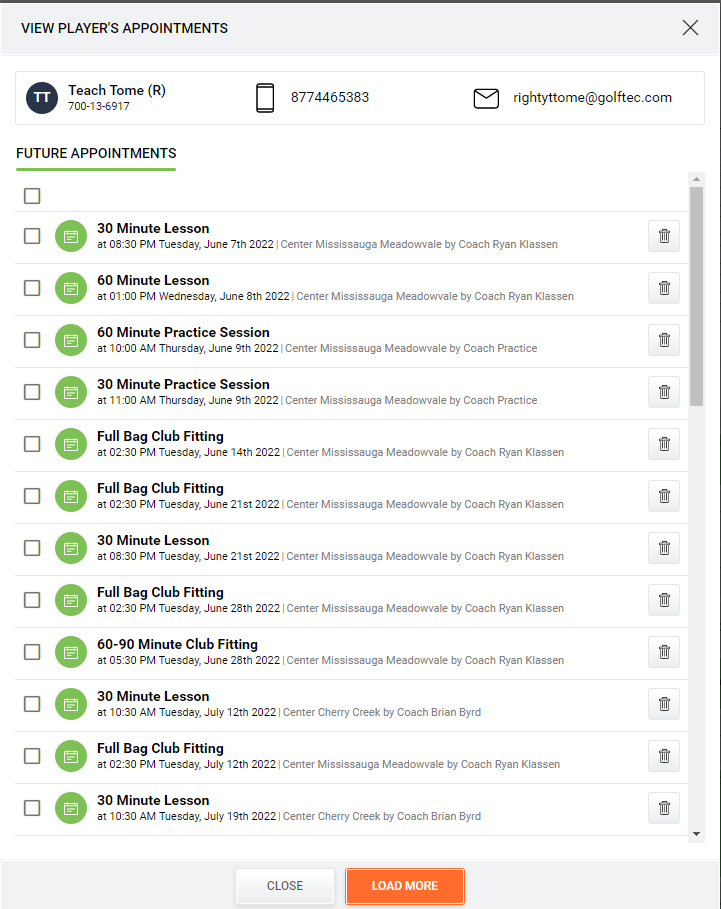
- One you're on this screen, you can select the
 next the appointments you want to cancel, or you can click the one directly under Future Appointments to select all of the appointments.
 - Once you have selected the appointments that you want to cancel, an option will appear to Cancel Appointments Selected.
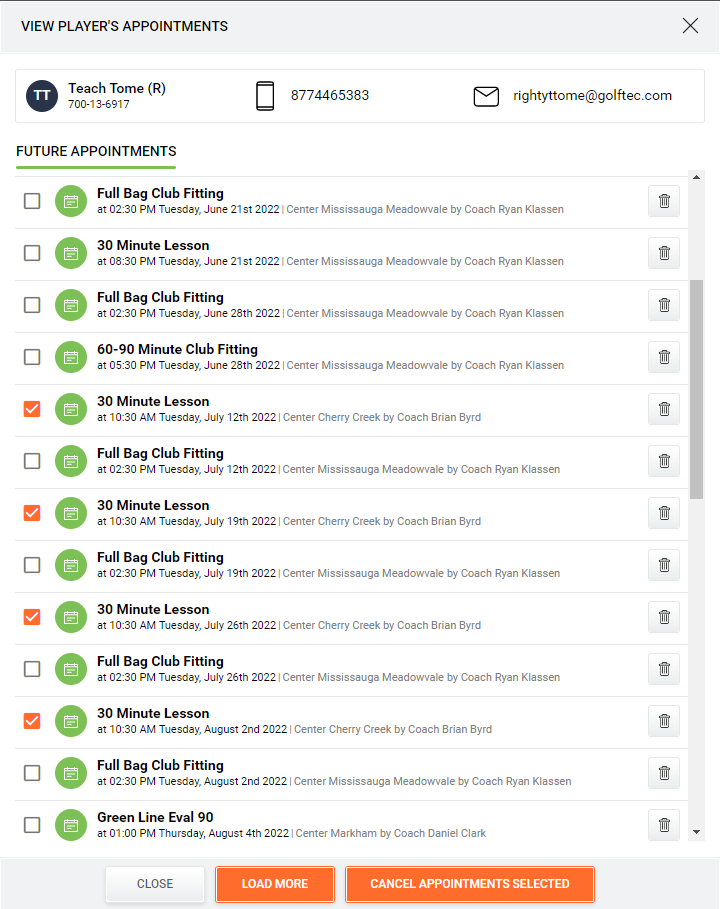
- Click that link and you will get a confirmation dialogue box confirming those cancellations.
- In the Lesson Detail Pop up, choose the View Player's Appointments option.
- To cancel, find the date and time of the appointment you wish to cancel.
- Scheduling within CaddyMaster is fairly intuitive and straight forward.
- Uses within the CSR Department
- Having covered how the Schedule works, it is best to cover how you in the CSR Department will utilize this information.
- Here we will go over different scenarios that you will run into that this information will be most useful.
- Confirming Lessons took place.
- Students will reach out to the CSR Team if they do not see their videos uploaded to their account.
- If you do not see the appointment in their profile, you can navigate to the Schedule and double check that the lesson was taught under the correct account.
- There will be instances where a lesson is taught either on the wrong Student's account or on a Duplicate Account, and this will help with determining where that lesson is.
- If the lesson is taught to a wrong account, change the category to Center Tech Support and include the WUCIs of both accounts with an indication on which account the lesson should have been taught to.
- Checking for Schedule issues with the Clubhouse.
- Students will open tickets if they do not see times available with their coach or center to schedule in the Clubhouse.
- Double check in the Schedule that the coach is still on the schedule and has open times available.
- If the coach is no longer on the Schedule, check the Student's Clubhouse to see if you are able to see available times with another coach at the center that you know is still there and has availability.
- In the event that the Student reports no Practice times are showing as available, check to make sure that the Schedule for that center has the practice columns open and that there is availability.
- If the Practice Column is completely blank, contact the Center Manager or Regional Manager to inform them of this, and they will set the schedule to open up those times for scheduling.
- If the Practice Column is open, you can check the Student's Clubhouse to see if you can see any times available.
- Be sure to check that the Student meets all of the parameters of the Clubhouse Booking Logic to ensure that they should be able to schedule practice sessions before moving to any other steps.
- Be sure to check expiration dates, as well, since some students may be trying to schedule practice sessions beyond the expiration date of their practice plan.
- There are other potential causes for a Student not seeing times available in the Clubhouse Scheduling Tool, but it is best to confirm that they should be able schedule before looking for those causes.
- Checking Coach Schedules.
- Some tickets will require contacting the Student's coach for clarification or confirmation on some aspect of the reported issue.
- Check the schedule to see if the coach is available to respond in a timely manner.
- If the situation requires immediate action, and the coach is not in the center and won't be for a couple of days, be sure to contact the Center or Regional Manager in addition to the coach to be sure someone local has eyes on the issue right away.
- Consolidating Accounts for a Student.
- On occasion, you will come across a Student with more than one account who has lessons scheduled between both accounts.
- Determine which account is the one the Student prefers moving forward, cancel all appointments on the extraneous account, and schedule those same appointments under the correct WUCI.
- We want to offer the best service possible, so ensuring that the Student has the least amount of work to fix an error that was caused by GOLFTEC will go a long way to improve the image for our services both in and outside of the GOLFTEC Training Centers.
- Confirming Lessons took place.
- These are the biggest 4 reasons that you will check the Schedule.
- There will be others that you will come across where being able to navigate the Schedule will be useful. Be sure to do a refresher on this information every now and again to stay ready for those situations.